When an employee receives sick or disability pay from a third-party provider (e.g., an insurance company), the employer is still responsible for correctly recording these wages for tax and reporting purposes.
This guide explains how to set up and process Third Party Sick Pay in Vista Payroll, assuming the third party:
- Deducts the employee’s FICA and Medicare taxes, and
- Transfers the employer’s portion of those taxes to your company.
Step 1: Create the 3rd Party Sick Pay Earnings Code
- Go to Programs > PR Earnings Codes
- Open the PR Earnings Codes form.
- Create a new code called 3rd Party Sick Pay.
- Set Calculation Type to Amount-based.
- Check the Include in Liability Distributions box.

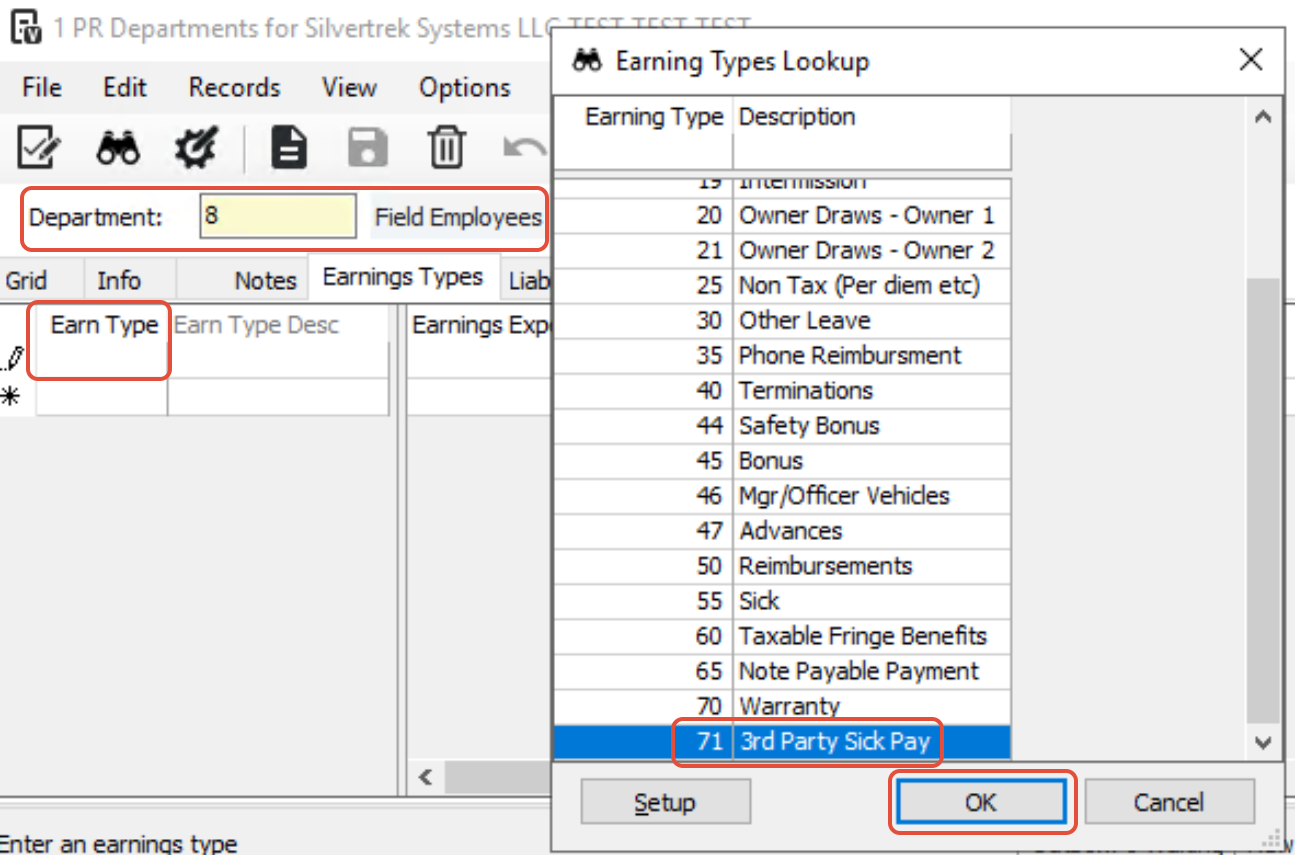
6. In the Earnings Type field, press F5 and create a new Earnings Type specifically for this code (e.g., “Third Party Sick Pay”).

7. Save your changes.
This Earnings Code records the gross sick pay amount paid by the third-party provider.
Step 2: Assign the Earnings Type to a Department
- Go to Programs > PR Department
- Open the department where the 3rd Party Sick Pay will be posted.
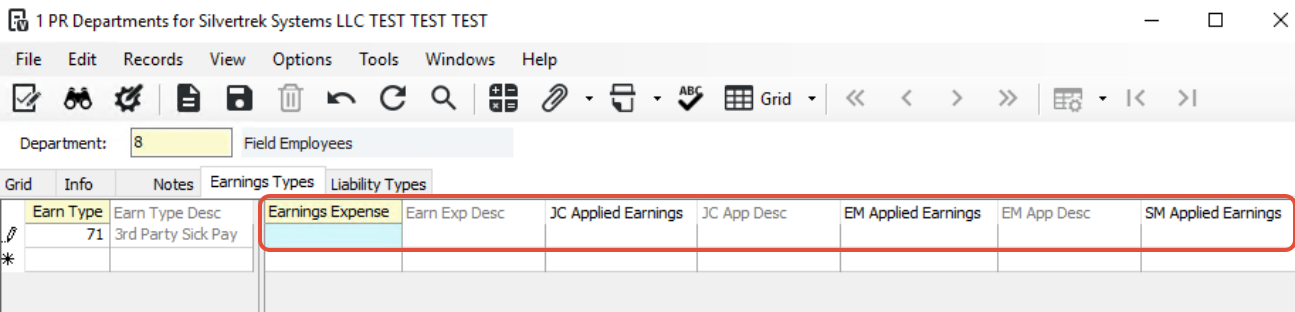
- Go to the Earnings Types tab.
- Add the Earnings Type created in Step 1.
5. Assign a GL Account that will act as a pass-through for both earnings and deductions related to 3rd Party Sick Pay.
6. Save and close.
This GL account will be used to offset the earnings and deductions so that no cash is actually paid to the employee.
Step 3: Create a Deduction to Offset the Sick Pay
- Go to Programs > PR Deductions/Liabilities
- Create a new Deduction Code called 3rd Party Sick Pay Offset.
- Set Calculation Category to Any or Employee.
- Enter the same GL account used in Step 2.
- Set the Method to Rate of Net.

6. This will enable the Garnishment Group field.
7. Press F5 in the Garnishment Group field to open PR Garnishment Groups (you’ll define this group in the next step).

Important: Do not check the “Use YTD accumulations to correct rounding errors” box. If this box is checked, Vista will attempt to “correct” your overrides during payroll processing, which may cause incorrect results.
8. Go to the Basis Codes tab.
9. Add the Earnings Code created in Step 1.

This deduction offsets the earning amount since no actual cash is paid out.
Step 4: Set Up the Garnishment Group
- Go to Programs > PR Garnishment Groups
- Create a new Garnishment Group called 3rd Party Sick Pay.

3. Go to the Deductions/Earnings tab.
- Add the following:
- The Earnings Code from Step 1.

3. Any other deductions that should be taken from those earnings.
Do not include FICA or Medicare here, since the third-party provider has already withheld them.
Step 5: Link the Garnishment Group to the Deduction
- Go to Programs > PR Deductions/Liabilities
- Return to the 3rd Party Sick Pay Offset deduction created in Step 3.
- Enter the Garnishment Group number created in Step 4 in the Garn Group field.
- Enter 1.00 in both Rate/Amount #1 and Rate/Amount #2 fields.

Step 6: Add Deductions and Liabilities to the Earnings Code
- Go to Programs > PR Earnings Codes
- Return to the 3rd Party Sick Pay earnings code.
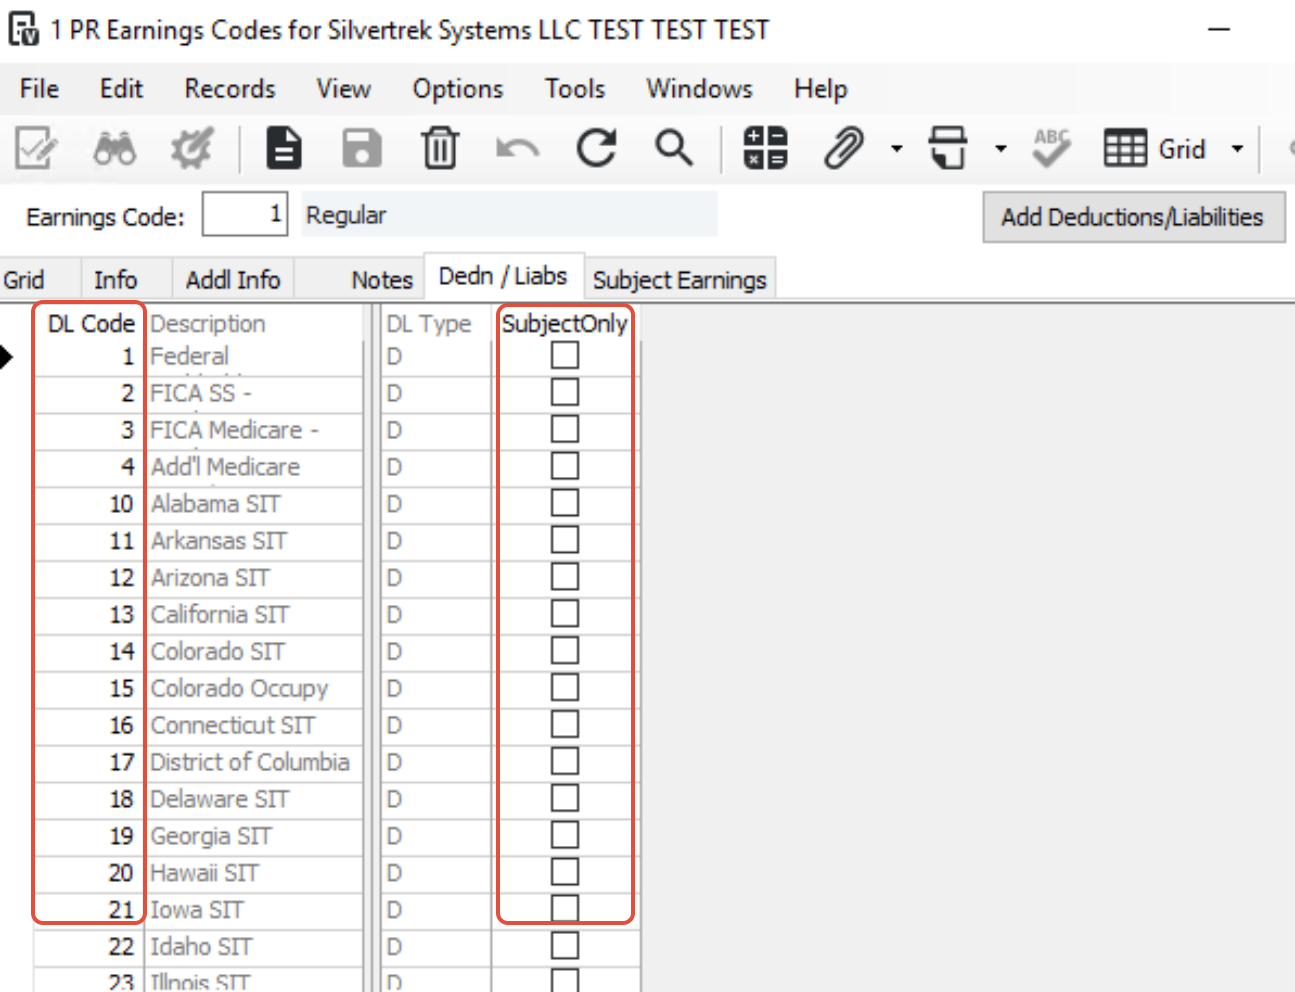
- Go to the Deductions/Liabilities tab.
- Add all deductions and liabilities that should include 3PSP in their Subject Wages.
- Check the Subject Only box for any deduction that should include these wages as taxable income without calculating a tax on them.
Example:
Federal and state withholding taxes are marked as Subject Only, so the wages appear as taxable income on the W-2 but no tax is withheld. You may also include FUTA and SUTA here if you want subject wages to reconcile with other taxable codes.
Step 7: Assign the Deduction to the Employee
- Go to Programs > PR Employee Dedns/Liabs
- Select the employee receiving Third Party Sick Pay.
- Add the 3rd Party Sick Pay Offset deduction (from Step 3).
- Check the Employee Based flag.
- Enter an appropriate Frequency Code (e.g., “Always”).
- Set Processing Sequence to 1.

The deduction will only calculate when the 3rd Party Sick Pay earnings code is present on the employee’s timecard.
Step 8: Record the Sick Pay Earnings
- Go to Programs > PR Timecard Entry
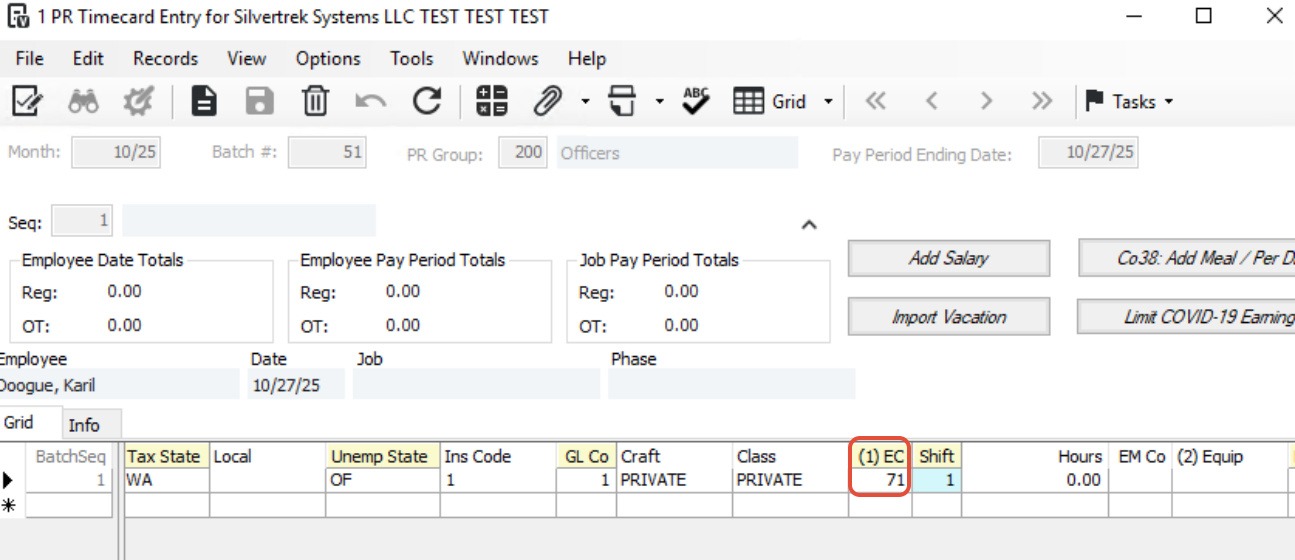
- Enter a new timecard for the employee.
- Use the 3rd Party Sick Pay earnings code.
- Enter the amount of third-party sick pay to record.
- Save the entry.
Step 9: Process Payroll
- Go to Programs > PR Payroll Process or Employee Pay Sequence Control
- You can process the employee individually or within a regular payroll batch.

Step 10: Override FICA and Medicare
- Go to Programs > PR Employee Pay Sequence Control → Deductions Tab
- Locate the employee’s pay sequence.
- Go to the Deductions tab.
- Find FICA and Medicare deductions.
- Check the Override box for each.
- Leave the Override Amount at zero.
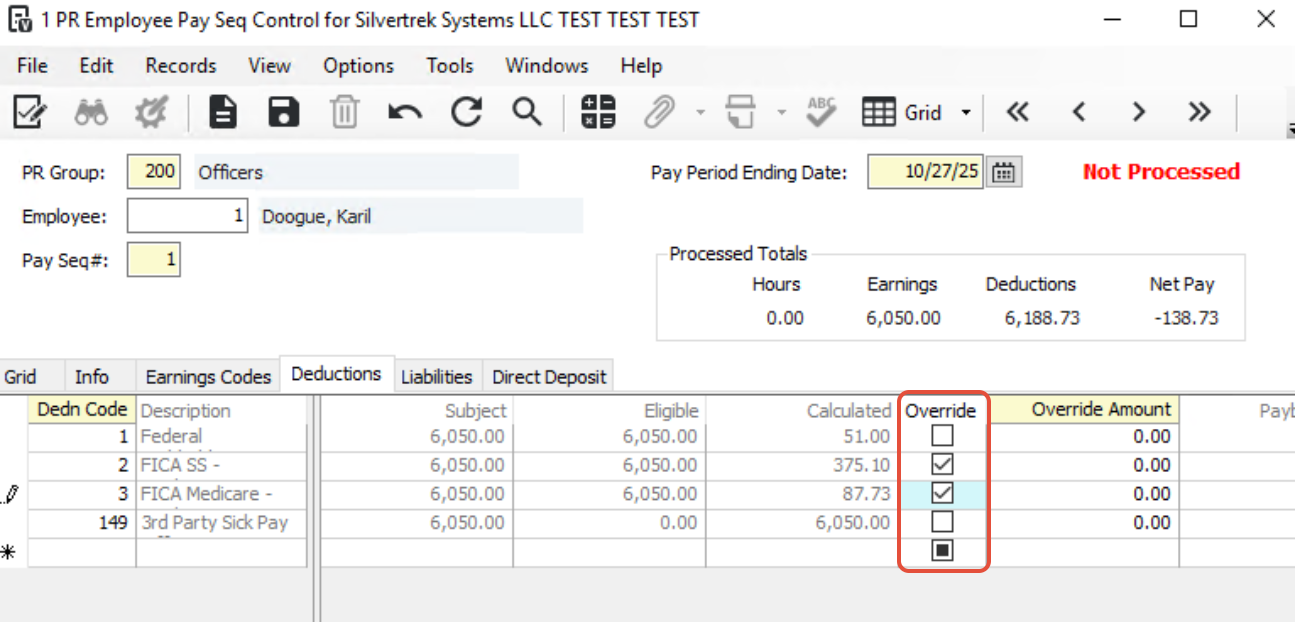
This ensures no duplicate FICA/Medicare are calculated, since they were already withheld by the third-party payer.
Step 11: Finalize the Payroll Record
- Go to Programs > PR Employee Pay Sequence Control → Info Tab
- Return to the Info tab.
- Click Process.
- Change Pay Method to X – No Pay.
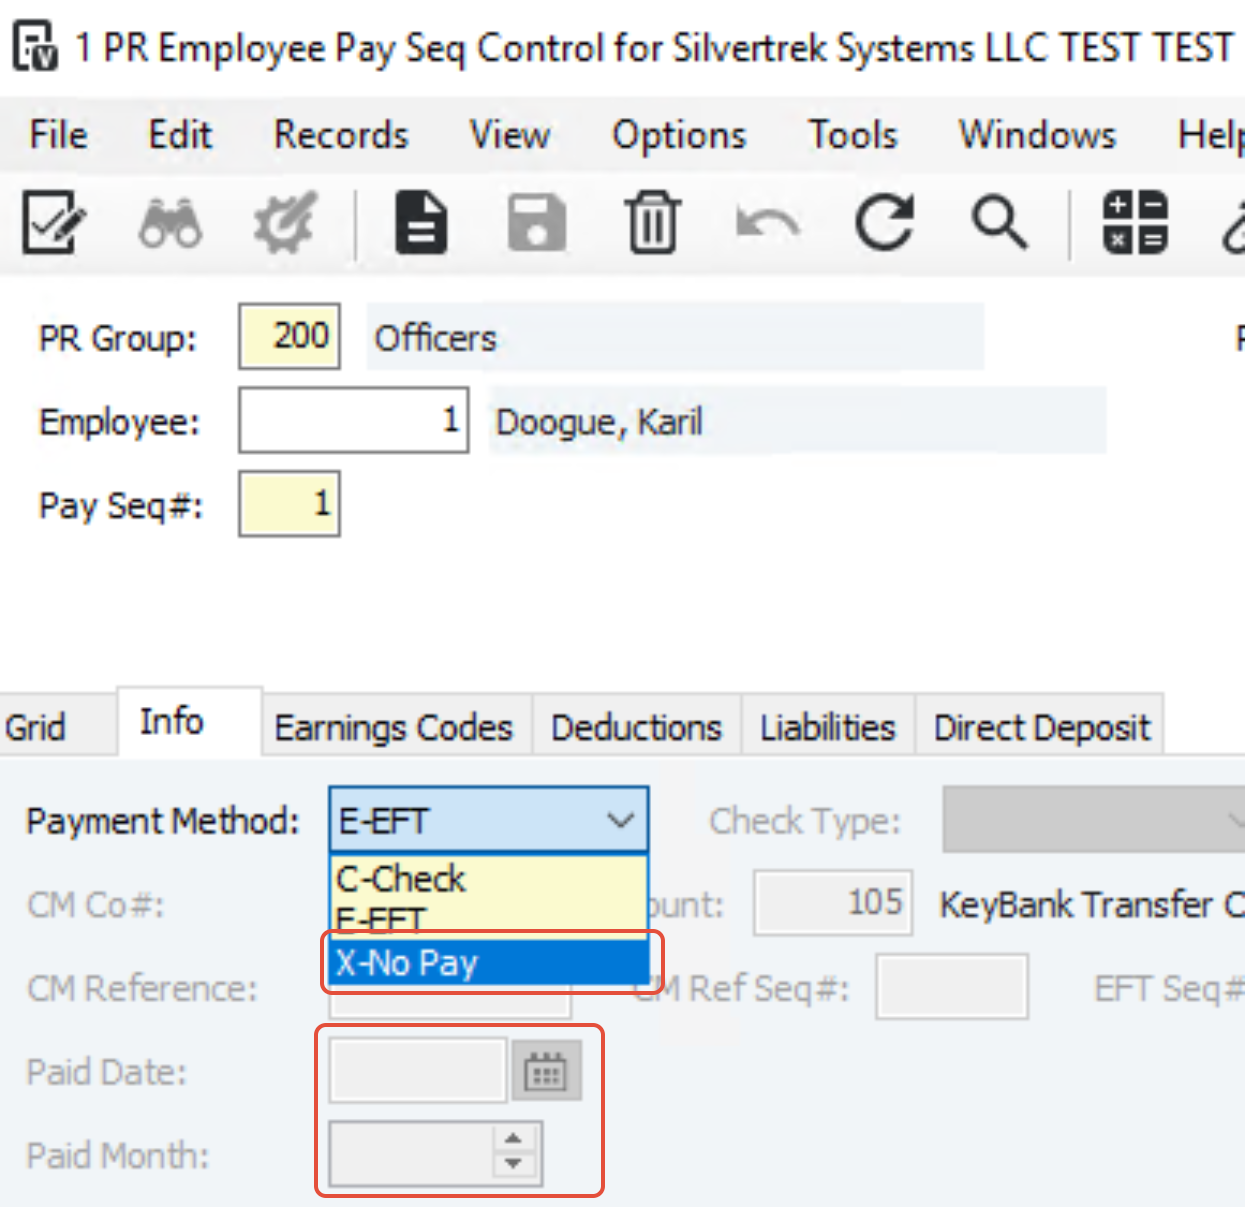
5. Enter the Paid Date and Paid Month.
6. Click Process again to finalize.
This records the 3rd Party Sick Pay for reporting (e.g., W-2) without issuing an actual payment.
Summary
- Earnings Code (3rd Party Sick Pay) Records the amount of third-party wages
- Deduction Code (3rd Party Sick Pay Offset) Offsets earnings, prevents cash payout
- GL Account (Same for both) Ensures net zero in payroll ledger
- FICA/Medicare (Override = 0) Avoids duplicate tax withholding
- Pay Method (X – No Pay) Prevents issuing a physical check
Was this article helpful?
That’s Great!
Thank you for your feedback
Sorry! We couldn't be helpful
Thank you for your feedback
Feedback sent
We appreciate your effort and will try to fix the article